

Acrylic pour is one of the easiest, creative ways to make abstract art. Instead of using a paintbrush, you are pouring the paint onto your canvas.
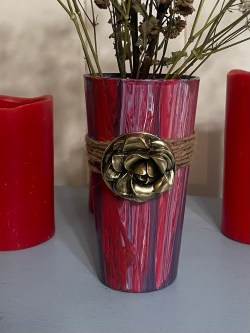
For this project, I wanted something patriotic for 4th of July. So I decided to make a red, white & blue vase.
For beginners, the most important skills to learn are the consistency and color layering.
Let’s try it out!
Supplies needed:
*Item to do the acrylic pour on. (Glass vase, ceramic mug)
*Acrylic paint – must be ‘multi surface’ paint for this project. (I used red, white & blue)
*Popsicle stick or something to stir the paint with.
*Dixie cups – to put your paint & water in. (I used plastic disposable medicine cups)
* 1 Solo cup
* Parchment paper
* Tray with lip around it (I used a cookie sheet from the dollar store).
* Masking tape if your making a mug
* Mod Podge – dishwasher safe. (Blue label)
* Approx. 1-2 T of water
Optional:
*Canvas
Set up:
Start by setting up the supplies you will be doing the acrylic pour on.
From bottom to top I layered the following:
- Cookie sheet
- Parchment paper
- Canvas
- Solo cup upside down
- Mug/vase upside down over the solo cup.
The solo cup under the vase is so it gives the vase a little extra space for the paint to drip. That way the vase will not stick to anything.
Tip :
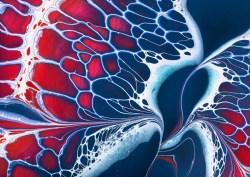
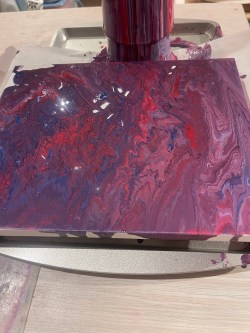
I put 4 bottle caps under the canvas to elevate it. ** when you pour the paint colors, it will pour over the vase and onto the canvas creating a unique design. Using the vase & the canvas, I’m getting two projects done.
Step 1:
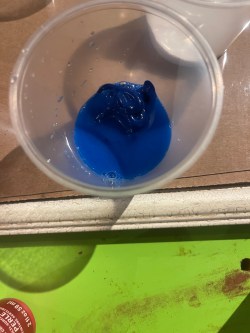
Set out your Dixie cups and pour your paint colors, (1 color per cup) in each cup. You’ll want enough paint to cover your item. Use your best judgment.
Step 2:
Add a few drops of water to each color and mix.
If you accidentally add too much water, just add a little more paint. You want just enough water in the paint to make it a little watered down so it pours easier. Without the water the paint is too thick to run nicely down your piece and spread out. I dipped my fingers in water and sprinkled the water in the paint that way.
Step 3:
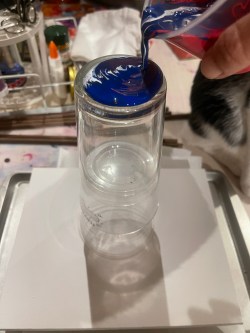
Once you are fine with step 2, decide the order you want the paint layered in and add the paints one at a time in a cup.
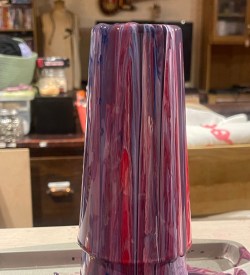
For mine, I decided to put the red in the cup first. Then blue and lastly white. The first color you put in the cup is what will appear on the outside part of your design.

Step 4:
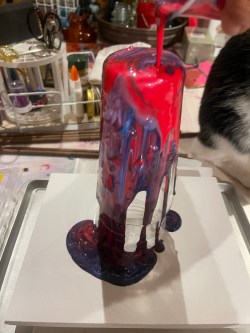
Create your masterpiece, start pouring. When pouring, you will want to move the cup of paint around a little to get all sides of your vase/mug covered.
Step 5:
Gently remove the painted item you made including the solo cup it’s on, setting it to the side on the cookie sheet. Now remove the canvas. Tilt the canvas in a few directions to spread the paint out.
Leave both pieces to dry for 24 – 48 hours.
Step 6:
After the 24 – 48 hours your piece should be pretty dry. We are going to take it one step further though….
Turn on your oven to 300 degrees.
Remove the vase/mug from the solo cup.
Once the oven is ready, put your item on a cookie sheet upside down, place it in the oven for 3 minutes.
This helps to cure the paint.
OPTIONAL:
To make this dishwasher safe, you can put 3 layers of ‘Dishwasher safe Mod Podge’ on it, letting each layer dry in between. I recommend this step if you’re doing a mug especially. For the Mod Podge to be considered dishwasher safe, it needs to cure for 28 days before using the item.
The drying & curing times can vary depending on humidity & temperature. The full curing is essential for it to be washed & handled frequently.
I went ahead and made a mug also.
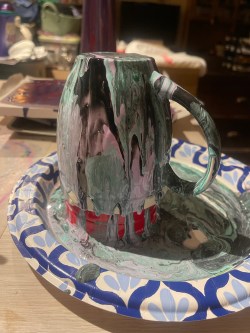
Before doing the mug, I used masking tape around the lip of the mug.
Tip:
If you get paint in a spot you don’t want, like the lip of the mug or inside the mug for example, you can use acetone to remove any unwanted paint.
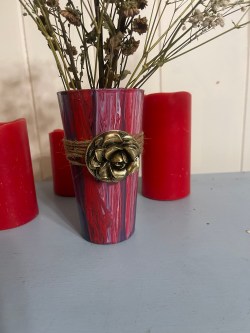
Once the vase I made was dried, I wrapped twine a few times around the vase and hot glued it in place. Then I hit glued a plastic gold flower button I had to the front of the twine.
Till next time ~
Mel

Leave a comment