


Rubbermaid bins without their lids, lids with no bin….. Not sure what to do with them? We had a big bin with no lid last year. I filled it up with our donation items and gave it to Salvation Army.
I seem to be the cat whisper where we live. All the strays or neighbors indoor/outdoor cats for some reason come to our house. I don’t mind don’t get me wrong. I adore cats! We have 4!!!! But I can’t afford to feed the neighbors cats and the strays. I will admit, I’m half tempted to sneak him inside. 😁.
It’s freezing out today, it’s 21 degrees with a feel like temperature of 8 degrees. Hibernation weather for me 😊. Every day this cute cat comes by our home. He watches us from a distance. Slowly as time goes by, he gets a little closer to me every day.
Before anyone asks… yes… I have asked neighbors, I’ve also posted pictures of this cat on the neighborhood page on social media. Sadly, no one has come forward.

Bob has been joking about making a cat “treehouse” for outside for them. As one of our cats that we took in, is an indoor/outdoor cat and still likes to see her cat friends outside. Bob had the idea of repurposing a bin and a lid with no mates into a cat hut for outside. Until it’s nicer out and we can make a more solid one.

Supplies needed:
Rubbermaid bin
Rubbermaid lid – a little bigger in size than the bin itself. You will be using this as the base.
Board – something smaller than the inside of the bin. We used an already carpeted board that came from a scratching post that broke.
Fabric or door mat– used to cover the board
☝️ if making your own fabric covered board, you will also need craft glue and a stapler.
Duct tape or outdoor glue.
Foam – used as insulation
Jigsaw or knife
Scissors
Drill
Step 1.

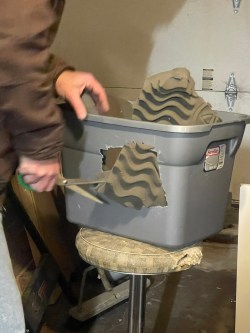
Mark out the area(s) with a marker where you’d like the opening for the cat to be.
Next drill a small hole on the side of the bin. Big enough to fit the knife or jigsaw blade in.
Step 2:
With the jigsaw, cut out your opening. We wanted 2 openings but not directly across from each other. So we offset them on each side.
Ours is far from perfect! We did make sure there were no sharp edges.
Step 3:
Once you have your opening(s), turn the bin right side up and start measuring out the walls and what will be the ceiling on the inside of the bin.
After you’ve measured, cut foam to size and then cut the spots where the opening of the bin will be. The cat entrance.
He used duct tape around the edge of the foam to hold it in place.
If I was to keep this permanent, I wouldn’t use duct tape. I’d probably buy the flex seal stuff.
We used a little tape around the openings as well.
The reason we made 2 openings was just in case another animal try’s to get in, the cat has a back entrance to escape through. Hence my reason to offset the holes. (Step 2)

Now you can cover the board with fabric or a door mat and place it on top of the lid. put some glue on the top of the board and place the fabric/mat on top of that. Smooth it out with your hand or you can even use a brayer or a nylon scraper.
Flip the board over. Fold the edging of the fabric neatly over what will be the bottom part of the board. With the stapler , you can now staple the edges of the fabric to the board.

Place the bin upside down on top of that .
Ok, so definitely not the prettiest cat hut, but it is the warmest! The foam we used is about 2” thick.

We put ours under and towards the back of the evergreen bush where our furry feline friends like to camp out.
Till next time ~
~ Mel

Leave a reply to Lori Pohlman Cancel reply