

Well, for me this is a new art. This is one of those things where you see an article on something and then you don’t find anything else on it. That makes it a little difficult. People write articles about it, however they only write the basics. They do not answer any questions. Like after it’s dry can you put another layer on? ( I did attempt this and it didn’t really stick.)
Plaster cast is gauze with plaster of Paris in it. It’s used for designing and strengthening sculptures, masks, making home decor. There’s quite a bit of things you can create with it.
Almost any craft stores sells it. I bought mine on Amazon for less than $10.
👇
Plaster cast is an alternative to paper mache.
I thought I’d try it out. This stuff is super easy to work with and fun!
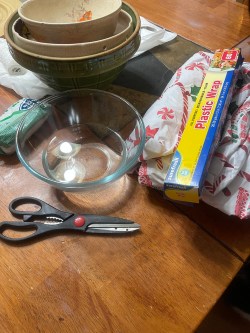
Supplies needed:
• Plaster Cast Rolls
• Bowl of water
• Scissors
• Newspaper or old tablecloth.
• Something to use as a mould- I used a bowl
•Plastic wrap OR Vaseline ( I do not recommend using the Vaseline due to how hard it takes to wash it off without leaving grease behind)
Step 1:
Set up your space by covering the table or area you will be working on. It can get a little messy.
Step 2:
If you’re making a bowl, turn the bowl upside down and cover it with plastic wrap. Unless you are making something like a piñata or a sculpture, something that you won’t need plastic wrap for.
Step 3:
Cut the plaster cast into strips. You can cut how ever big you’d like. For mine, I cut the plaster cast rolls into approx. 9” long strips, then cut that in half length wise.
Get another bowl with water in it ready.
Step 4:
One strip at a time, dip a strip into the bowl of water. Gently wipe some of the water off by putting that strip between your finger and thumb. Wipe your fingers gently all the way down to get rid of excess water.
Next put that strip over the plastic wrap on your mould.

Over lap the strips a little as you lay them down to prevent any holes/openings.
For the next layer, lay the strips in the opposite direction as the first layer.
Continue repeating the steps until you have your bowl/mould covered.
Periodically wet your fingers and smooth down any strips or bumps as you go.
Repeat until you have as many layers as you’d like. I did 2 layers ( which was 1 roll ).
Let it dry overnight.
Next Day….
Step 5:
Your bowl should be completely dry the next morning. You can do 1 of 2 things. Either try to gently take the item you made off the bowl/mould from the position it’s in OR turn it right side up and gently pull the bowl off the item you made.

By putting the plastic wrap on first, the item you made will not stick.
Step 6:
Now you can trim the excess pieces off the edge of the bowl. Mine was still a little wet, so I went ahead and added a trim around the edge of it to cover up the seam and let it dry over night.


Once you’re done you can now paint it, decoupage (or both), anyway you’d like to decorate it.


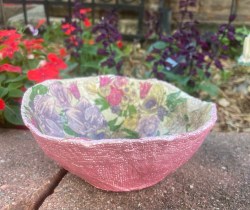
Have fun creating!
~Mel

Leave a reply to mel23h Cancel reply